Labour and materials for a service job can be entered from timesheets, via the service call sheet (job card), or direct from supplier invoices. Micronet automatically prices service jobs for you based on your own markups and labour rates. Materials can be drawn directly from your MDS Inventory master file, or purchase orders can be raised against jobs and committed costs tracked until the items are received from your suppliers.
Use this option to post materials directly to a service job in MJC.
|
Technical Tip There are several other ways to post materials to jobs:
A summary of suppliers’ invoices can also be posted to a job through MDS Goods Received - refer to "Goods Received - File - Post Summary to Jobs Costed". |
Materials posted directly to jobs or via Goods Received in MDS can be partly or completely moved from one job to another with a full and comprehensive audit trail.
MJC only allows the posting of material receipts through MDS if the job’s status is assigned as Active. Inactive jobs cannot be posted against unless the job’s status is first changed to Active.
|
Reference For information about receiving goods for MJC jobs through MDS, refer to "Receiving Goods for MJC Jobs". |
Materials may be posted to jobs either before or after the jobs have been invoiced. MJC continues to accrue Work in Progress (WIP) for subsequent material receipts.
To add materials directly to a service job in MJC:
Refer to "Maintaining the Service Job Header".
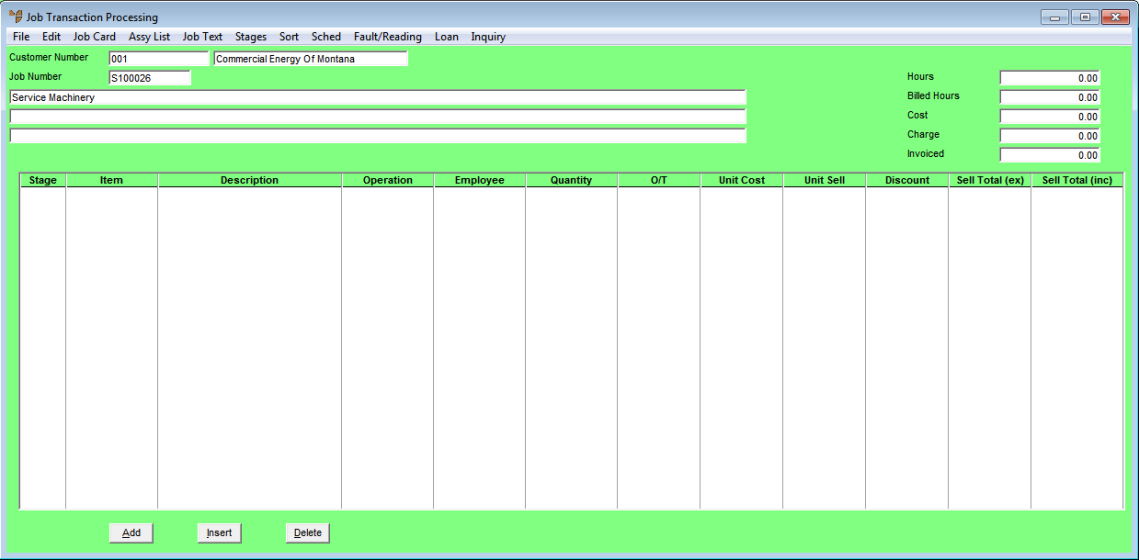
Micronet displays the Job Transaction Processing screen.
|
Technical Tip By default, the Job Transaction Processing screen is set to add or edit materials for a job. You can also add or edit text or labour, depending on the option selected under the EDIT menu on this screen - ITEM, TEXT or LABOUR. For more information about the other two options, refer to "Adding Text to a Service Job" and "Adding Labour to a Service Job". |
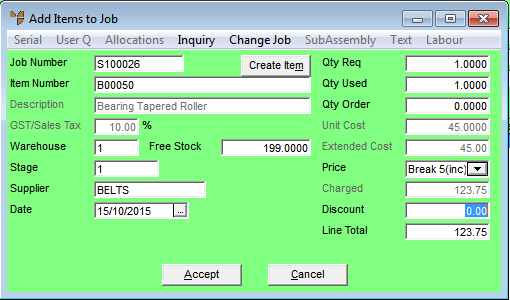
If you selected to add, insert or edit an item, Micronet displays the Add Items to Job screen.
|
Technical Tip You can add or view narrative text for an item by pressing F5 - refer to "Adding or Viewing Narrative Text". |
|
Field |
Value |
---|---|---|
|
Job Number |
Micronet displays the job number for the selected job. |
|
Item Number |
Enter the item number to be posted against the job. You can also press Tab or Enter to select an item. |
|
Technical Tip If your user security is setup to allow the creation of temporary items during transaction processing, Micronet displays a Create Item button to the right of the Job Number field. Refer to "Add Items to Job - Creating Temporary Items" for more information about creating temporary items. |
|
Description |
Micronet displays the description of the selected item. You can change this description if required. Normally, this would only be changed for the posting of non-inventory items. |
|
GST/Sales Tax |
Micronet displays the default GST/sales tax percentage from the Item master file. |
|
Warehouse |
Micronet displays your default warehouse as set in your user security. |
Free Stock | Micronet displays the quantity of stock on hand in the selected warehouse. | |
Stage |
Micronet displays the default stage for this job as set in the Department master file (refer to "Adding a New Department"). Normally this would be set to 1. You can delete this and enter another stage if required. You can also press Tab or Enter to select a stage. |
|
Reference If your job has multiple stages and you haven't created them yet, refer to "Job Transaction Processing - Stages - Variations and Stages". |
Supplier |
Micronet displays the preferred supplier for the item. You can enter a different supplier number, or press spacebar then Enter to select a supplier. If the item was allocated to the job through the MDS Goods Received program, Micronet displays the supplier number. |
|
Date |
Micronet displays today's date. You can change this if required. If the item was allocated to the job through the MDS Goods Received program, Micronet displays the invoice date. |
|
Qty Req |
Enter the total quantity of the item needed for this job. |
|
Reference If your company is configured for multiple bin locations and your userID allows you to edit bin locations, Micronet displays the Bin Locations and Quantities screen. Refer to "Add Items to Job - Selecting Bins and Quantities" for more information. If Micronet has been setup to use the Main Bin Only or Priority Order and you do not have authority to edit bin locations, the selection of bins will be automatic and performed in the background. |
|
Warning If an item is no longer required for the job and you want to credit it back into stock, the usual method is to delete the item line; Micronet automatically updates the stock figures for you. However, if you want to be able to trace the items allocated to jobs, you can enter a negative quantity in the Qty Req field to credit an item back into stock. Note that this is not the recommended way of crediting items. If you do enter a negative quantity, when you invoice the job Micronet will create a negative invoice rather than a credit note. To prevent problems with the costing for the job, you should disable the Unit Cost field using the JOBDisableCostonNegative Registry key (refer to "Job Costing" for more information). Note also that when you use this method, WIP on the job can become inconsistent if the average cost of the item has changed. In addition, if you save a job with a line that has a negative quantity, you cannot later amend the quantity on that line. Micronet will display warning message that you need to add a new line instead. |
Qty Used |
When you enter a value in the Qty Req field, Micronet checks the stock available. If sufficient stock is available, this field displays the same quantity as the Qty Req field. If there is not enough stock available, Micronet displays the quantity available. You can change this amount if required. This is the quantity you want to bill your customer for. |
|
|
Technical Tip If the Default Used Qty to Zero on Jobs field on the MJC General Configuration screen is set to Yes (see "Edit - Applications - MJC - General"), Micronet will always default to the Qty Used to zero and the Qty Order to the quantity entered in the Qty Req field, ignoring stock availability. This includes when kit items on a job line are exploded. |
Qty Order |
If not enough stock is available (or you changed the Qty Used), Micronet displays the difference between the values in the the Qty Req and Qty Usedfields. This is the quantity of the item to order for this job from a supplier. The Automatic Purchase Orders program in MDS scans this field and adds the amount entered to any automatic purchase order for this item. Automatic purchase orders are displayed for confirmation before they are printed or faxed to suppliers. For more information about automatic purchase orders, refer to "Inventory - Automatic Purchase Orders". You can also create a manual purchase order for the item if required (refer to "Inventory – Purchase Order Creation"). |
|
Unit Cost |
Micronet displays the unit cost for non-inventory items so you can enter the correct cost for the item being posted. You cannot enter a unit cost for normal stock lines. |
|
Extended Cost |
Micronet calculates and displays the extended cost – Qty Used x Unit Cost. |
|
|
Warning If your costs are set to display anything other than average cost, be aware that an item's cost prices are saved the first time a job is posted and are not updated after that. This means that if you are editing a line on a job that has already been saved, you first need to check the item costs to see if they have changed. For more information, see the Display User Cost on Lines field on the MJC General Configuration screen in your company configuration ("Edit - Applications - MJC - General"). This warning only applies when that field is set to Yes. If your costs are set to display average costs (Display User Cost on Lines field is set to No), the costs are updated and displayed on this screen. |
Price |
Select the unit selling price break or select Nett to enter your own net price. |
|
Charged |
Micronet displays the default selling price for the item according to your customer’s default pricing structure in MJC, or markup tables if selected in your system parameters (refer to "Edit - Applications - MJC - Markups"). If you selected Nett in the Price field, you can enter a price. |
|
Discount |
Micronet displays any discount that applies to this item for this customer. This could be set in the Debtor master file, as a debtors contract price or as a special price in MDS. You can enter a discount or change the discount displayed if required. |
|
Line Total |
Micronet displays the total cost for this item, i.e. the quantity required x the charged amount minus any discount. |
If you added an item to the job, Micronet redisplays the Add Items to Job screen so you can add further items if required.
|
Technical Tip If you added a kit item in a Manufactured category to the job/estimate (not a sub-assembled kit item), when you select Accept Micronet displays the Read Kit screen.
In the Explode Kit field, select Yes if you want Micronet to break the Bill of Materials (BOM) up into its component items, or select No to leave the master kit item intact on the job. If you explode the kit, each component item can then be edited as required. If you select to explode kit items and the Default Used Qty to Zero on Jobs field on the MJC General Configuration screen is set to Yes, the Auto Purchasing field on this screen will default to Yes - All Stock – see "Edit - Applications - MJC - General". |
|
Warning Once a kit has been exploded, it cannot then be reassembled at a later time. |
|
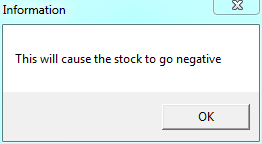
Technical Tip If you change the Qty Used field to a quantity that is greater than the quantity available, Micronet displays a message warning that this will cause stock to go negative. Select OK to clear this message and update the Qty Used if required. If you leave the quantity unchanged, another negative stock warning may be displayed when you print the invoice depending on your company settings (2.8 feature).
|
Micronet redisplays the Job Transaction Processing screen, showing the items, text and labour posted to the job at the bottom of the screen.